A blog about social networking and SEO, google, backlinks, traffic, search engine optimization, link building, search engine rankings, anchor text, rank, backlink checker, internet, seo tips, SEO marketing, SEM and cats
Organize your data around your company's geographic regions.
Importing geographical data enables the mapping of geographical IDs to custom regions, allowing you to report on and analyze your Google Analytics data in ways that are better aligned with your business organization.
How Geographical Data import works
Google Analytics provides a number of geographical dimensions, such as City, Country, Continent, etc. The values for these dimensions are automatically derived from the IP address of the hit, which is convenient but also has a few drawbacks:
IP-based locations are approximate.
Values for standard geographic dimensions are localized into the user's preferred language, possibly making it complicated to share the data with users who speak other languages or use other tools.
Many businesses operate in arbitrary regions that make sense to them but that don't appear on a map. For example in North America, you might operate in East, Central, and West groups of states or provinces. In Europe, companies might operate across North, Central, and South groups of countries.
As an alternative to IP-based regions, you can create your own custom regions by mapping them to a set of geographical ID dimensions. These dimensions are based on widely used standards, so sharing the data with other users and applications is simpler. The table below lists the available geographical IDs and the standards upon which they are based.
If you close a remarketing list in AdWords, that list no longer accumulates users, but it still serves ads.
Add your audience to an ad group
When you create a Remarketing Audience in Analytics, it is then available in the advertising account you selected. If you selected an AdWords account, then you need to add that audience to at least one of your ad groups before the users in that audience are eligible to see your ads. (Remember, your ad still needs to win the auction before anyone sees it.)
Create custom-combination lists
In AdWords you can use custom-combination lists to build sets of conditions from existing remarketing lists (including the Remarketing Audiences you created in Analytics), interest categories, and existing combinations of lists, and then display your remarketing ads to users who meet those conditions.
For example, if you wanted to remarket to people who had visited the product pages for your new hybrid car and whose web travels had also demonstrated an interest in hybrid vehicles, you could:
Create a list in Analytics based on a Segment that identified users who viewed your hybrid-car pages.
In AdWords, combine that list with users who fall into the interest category of Hybrid & Alternative Vehicles.
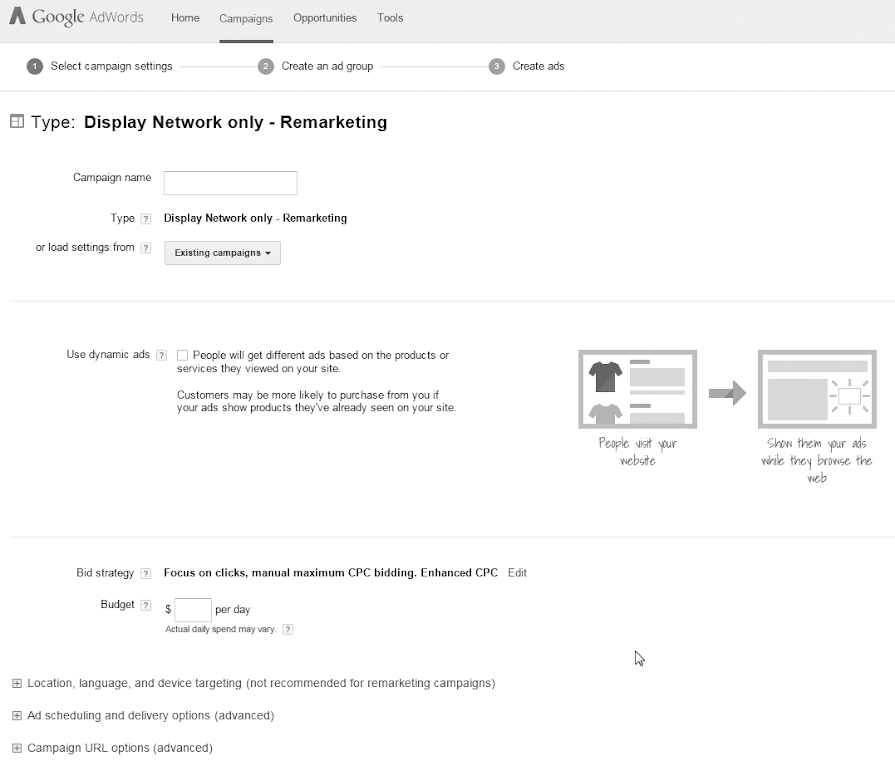
Link directly from Analytics to AdWords to create a campaign
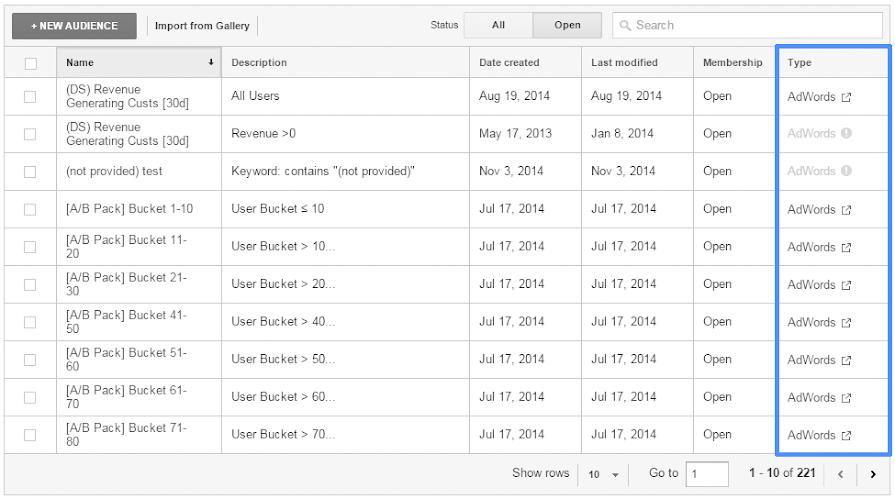
The list of Remarketing Audiences contains a link for each audience to its respective AdWords account.
If your current Analytics login has access to the linked AdWords account, then the link in the table is active for you.
Click the link to start creating your AdWords campaign based on the Remarketing Audience:
Explore an interactive view of your Acquisition channels.
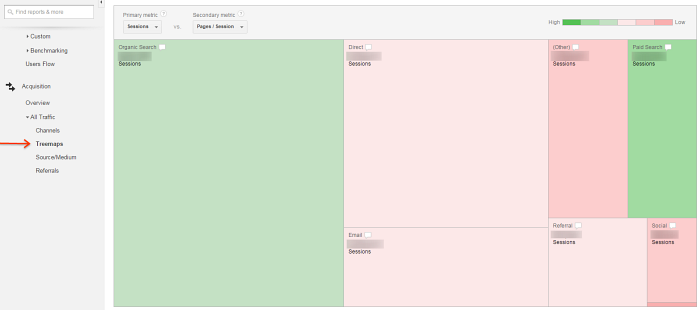
The Treemaps report lets you visually explore trends in your Acquisition channels so you can quickly and intuitively develop hypotheses about your incoming traffic. Treemaps represent data as rectangles. The size and color of each rectangle represent different metrics, so you can combine different aspects of your data into a single visualization. Treemaps are a good hypothesis-generation tool because they can help expose the relative importance of, and the relationship between, different entities.
Use theTreemapsreport
Access the report
Type "Treemaps" in the search box above the report navigation, and select the result. You can also browse the report navigation to find it: Acquisition > All Traffic > Treemaps.
Select what data appears in the report
Each rectangle in the report represents a single acquisition channel. Click a rectangle to see a more granular view of each channel displayed in the report. For example, click the Social rectangle and drill down to look at the individual Social Networks where your traffic originated.
Hover over the dialog box icon in each rectangle to get specific data for each metric represented by that rectangle.
After you've clicked a rectangle, a breadcrumb appears above the report to show you where you are in the acquisition channel hierarchy. You can use these links to quickly navigate through the hierarchy. For example, if you've drilled down into the Source level in the report, you can click Referral in the breadcrumb to see that data, instead.
Read the report
All metrics in this report are organized into either a Primary or Secondary group. Use the drop-down menus above the report to select different Primary and Secondary metrics. You can only select one Primary and one Secondary metric at a time.
Primary metrics are volume metrics, like Sessions or New Users, and are represented by rectangle size.
Secondary metrics are relative metrics, like Bounce Rate or Pages/Session, and are represented by color and saturation. Green is positive, and red is negative. The darker the green, the better the Secondary metric, and the darker the red, the worse the Secondary metric.
Example
If you:
Are looking at Landing Page within the Email channel
Have selected the Primary metric Sessions and the Secondary metric Pages/Sessions
You’ll see that:
The larger the rectangle, the higher the number of sessions for that landing page.
Landing pages that have fewer pages/session will be on the red color scale, and the darker the red, the lower the number of pages/session.
Landing pages with more pages/session will be green, and the darker the green, the greater the number of pages/session for that landing page.
Based on these data points, you can start to form hypotheses: which landing pages you should use because they have more pages/session, or which landing pages should you focus on because they drive the most sessions (in absolute terms).
Limits and caveats
The Treemaps report is only available in web reporting views. This report is not available in other types of reporting views, like mobile app views. Learn more about views.
The treemap will only display up to 16 rectangles at a time. If you have more than 15 entities to display in the treemap, the first 15 appear as individual rectangles, and the rest are grouped together. In the report, the grouped category appears as one rectangle labeled Other.
Segmentation is not (yet) supported in the Treemaps report.
Higher numbers are better for all metrics, except for the Secondary metric Bounce Rate. For the Secondary metricBounce Rate, higher numbers are worse. This report automatically considers this and reverses the green-to-red overlay color scale for this metric; the higher your Bounce Rate, the darker the red color. Similarly, the lower your Bounce Rate, the darker the green color.
The color scale is relative to the weighted average of all entities. The color spectrum moves from red to green, and the intensity of the color that appears in each rectangle is relative within your report. There are no absolute or fixed values associated with any specific color or shade of color.
Ces données demeurent précieuses pour établir ou vérifier votre stratégie de communication en ligne, personnelle ou professionnelle, voici donc les :
FAITS SAILLANTS
Au cours des dernières années, les médias sociaux se sont démocratisés pour prendre aujourd’hui une place proéminente sur le Web. Utilisés par plus de sept adultes québécois sur dix (71,7 %), ils font désormais partie intégrante de nos vies et modifient la manière dont nous utilisons Internet. Par le biais de l’étude NETendances 2014, le CEFRIO s’est penché sur la question et vous présente ses conclusions.
En ce qui a trait à l’attention portée aux publicités sur les réseaux sociaux, l’âge a une influence moins importante. Néanmoins, les internautes de 55 ans et plus portent moins attention à ces messages publicitaires que les internautes plus jeunes.
Vous pourrez approfondir votre lecture en accédant directement au site du CEFRIO par ici ;) ou en cliquant sur les liens d'intérêt à travers cet article, bonne lecture !!!
Watch this video to learn about the key concepts and terminology in Google Tag Manager.
Tags and Triggers
A tag is a snippet of code that executes on a page. Tags can serve a variety of uses, but most of the tags used in Google Tag Manager are designed to send information from your site to a third party. Examples include the Google Analytics tag and the AdWords Conversion Tracking tag, which send information about activity on your site to Google.
If you don't use a tag management solution such as Google Tag Manager, you add the code for each of your tags directly to the source code of your site. With Google Tag Manager, you can instead control all of your tags conveniently from a web user interface.
Tags typically execute, or fire, when the page loads, or in response to some interaction on the page. In Google Tag Manager, you define triggers with tags to specify when they should fire. An example of a trigger is the predefined "All pages", which as the name implies may be used to set your tag to fire on any page on your site as it is loaded.
Triggers and Variables
A trigger is a condition that evaluates to either true or false at runtime. It does this by comparing the value in a variablewith the value that you specified when you defined the trigger. For example, the predefined variable "url" always contains the URL of the currently loaded page. If you want a tag to fire only on the page example.com/purchase/receipt.html, you would define a trigger that looks like this:
{{url}} matches example.com/purchase/receipt.html
Here's the definition of the "All Pages" trigger. This trigger always evaluates to true because any URL (Regex .*) will match the currently loaded page URL.
{{url}} matches RegEx .*
You can define variables to suit your needs, each containing some piece of information that needs to be available at runtime. You can then use these variables in trigger conditions, or to pass information to tags. For example, you might define a variable that contains the price of an item that the user is viewing. Or, you might define a variable to contain a constant value such as your Google Analytics account id string.
Variables and the Data Layer
Let's say that you want to define a variable that contains the price of an item that the user is viewing. How does the variable know an item's price at runtime? It can retrieve the price from the data layer in your source code. (You'll need to work with your site developer to set up a data layer object that contains the information you need.) The data layer is an object that contains all of the information that you want to pass to Google Tag Manager. The data layer passes this information to Google Tag Manager via variables. The variables can then access the information where it can be used in triggers, for example, to determine whether or not tags should fire.
For example, let’s say that you want to fire a GDN Remarketing tag whenever a visitor spends more than $100 on your site. The trigger for the tag will need to know the value of visitor's transaction in order to evaluate whether or not it exceeds $100. To set this up, you could push the transaction value onto the data layer (using the dataLayer.push method) and define a variable that retrieves the value so that it can be evaluated by the trigger.
You don't necessarily need to set up a data layer in order for variables to retrieve runtime information. Variables can also be retrieved directly from JavaScript values, from the DOM, and via Google Tag Manager’s Auto-Event Tracking. ReadVariables and Google Analytics Events for more information. However, it is a best practice to have your variables retrieve information directly from a well-organized data layer object instead of trusting things to JavaScript variables or the DOM. If your variables depend upon specific variables or DOM elements and those variables or elements change during the course of site updates, your variables may no longer work. Referencing all of the relevant information in a data layer minimizes the likelihood of such a problem, allows for a well organized and accessible data model, and makes troubleshooting easier. Note that every page must have code that pushes the needed information onto the data layer; the data layer does not persist across pages.
What do you need to do to implement Google Tag Manager on your site? There are three possible implementation scenarios:
If your tags only need to fire when pages load (i.e. they don't need to fire in response to user interactions on the page) and the tags don't need any information beyond URL and referrer, you'll only need to add the container snippet to each page of your site.
If your tags only need to fire when pages load, but need information beyond URL and referrer, you may need to add code that creates a data layer and pushes information to it. Add the data layer code above the container snippet so that the data layer information is available on page load. Note that every page must have the code to create a data layer and push information to it; the data layer does not persist across pages.
If the information you need is available on page load directly from JavaScript variables and the DOM, you may not need to implement a data layer. However, retrieving information directly from JavaScript variables and the DOM should be considered an intermediate solution. The best practice is to set up a data layer that contains the needed information. Referencing all of the information in a data layer allows for a well organized and accessible data model and makes troubleshooting easier.
If the data you wish to collect or use to trigger a tag isn't available until after the user has interacted with the page (i.e. you need to fire a tag in response to a user interaction, not simply on page load), you will need to add code that pushes data to the data layer. For example, you might want to push metadata associated with a video that the user is playing, the color of a product (e.g. a car) customized by the user, or the destination URLs of clicked links.
Data Layer Default Values for Web
Google Tag Manager pushes a certain set of values to the data layer of web applications by default. These values are:
gtm.js – Pushed to the data layer as soon as Google Tag Manager is ready to run.
gtm.dom – Pushed to the data layer when the DOM is ready.
gtm.load – Pushed to the data layer when the window is fully loaded.
To ensure that Google Tag Manager is configured to meet your business needs, consider the following points.
How many accounts are needed? Who should create them?
Set up one account per company. The company for which the tags will be managed should create the account in Google Tag Manager. For example, if an agency manages tags on behalf of an advertiser, the advertiser should create the Google Tag Manager account and then add the agency's Google account as a user. Read Setup and Workflow to learn how to set up an account.
Agencies can manage their clients' Google Tag Manager accounts by signing into their own Google Account (assuming that the clients have followed the best practice of (1) creating the Google Tag Manager account themselves and (2) adding the agency's Google account as a user). Also, multiple users can manage the same Google Tag Manager account, and each user can be given different access permissions by the account administrators. Read Users and Permissions to learn more.
Are you a mobile app developer?
Set up one container per mobile app. Each new major version of your app should have a new container. (Minor updates to an app can use the same container since the config keys will likely be the same or very similar.)
Do you manage multiple domains? (Web)
Typically, you set up one container per web domain. However, if the user experience and tags on a website span more than one domain, it's best to set up a single container that serves all the domains involved. Here are a few considerations:
Configuration (rules, triggers, and variables) can't be shared across containers. So, if the tags and firing logic is similar across domains, it makes sense to use a single container, because maintaining multiple similar configurations is time-consuming and error-prone.
Having many tags in a single container can be confusing, and managing the container becomes more difficult. Also, defining too many tags and triggers increases the size of the container and the amount of data that the browser must download.
User permissions can only be set at the container level. If you need to prevent the administrators of different domains from changing each other's configurations, use a different container for each domain.
When someone publishes a container, all changes go live, regardless of domain. If you need to apply changes to one domain without affecting other domains, use a different container for each domain.
What tags do you have deployed on your website? Where?
Begin by identifying all of the tags you have deployed on your site and where they are deployed (e.g. in global headers or footers, on landing pages, confirmation pages, in response to button clicks, etc.)
Think about what information you want to collect and determine if there are additional tags you want to deploy. If the data you want to collect is not visible on the page, refer to the developer documentation for information on how to pass additional data to tags.
If all of your tags fire as pages are loading, and these pages can be identified by their URLs, a basic container implementation may be sufficient for your needs. Once your Google Tag Manager account and container have been created, simply place the provided container snippet (generated when you create the container) on every page of your website immediately after the opening HTML body tag. Read Setup and Workflow (Web) to learn about containers and the container snippet.
If any of your tags fire on button clicks, events, or specific pages that are indistinguishable by URL, your webmaster may need to customize your container implementation. Refer to the Google Tag Manager developer documentation for more information.
Regardless of whether you need a basic or customized container implementation, plan for a site-wide deployment in which you migrate all your tracking tags into Google Tag Manager at one time. This allows you to take full advantage of Google Tag Manager's benefits. When you want to add or edit tags in the future, you won’t have to retag your site and you can manage all your tag updates using Google Tag Manager.
Google Tag Manager allows you to quickly and easily update:
Tags and code snippets on your website, such as those intended for traffic analysis and marketing optimization. You can add and update AdWords, Google Analytics, Floodlight, and 3rd party or custom tags from the Google Tag Manager user interface instead of editing site code. This reduces errors, frees you from having to involve a web developer, and allows you to quickly deploy new features or content onto your site. Read Google Tag Manager for the Web, below.
Configuration and flag values of mobile apps that you have created. Instead of rebuilding and deploying new binaries, you can use the Google Tag Manager interface to change configuration values (for example, timeout, ad position, game play dynamics) and turn on flag-enabled features in your mobile apps. Read Google Tag Manager for Mobile Apps, below.
What is a tag?
A tag is snippet of JavaScript that sends information to a third party, such as Google. If you don't use a tag management solution such as Google Tag Manager, you need to add these snippets of code directly to files on your website or mobile app. With Google Tag Manager, you no longer need to maintain each of these code snippets in your source files. Instead, you specify the tags that you want to fire, and when you want them to fire, from within the Google Tag Manager user interface.
How It Works
Google Tag Manager works via its own container tag that you place on all your website pages. The container tag replaces all other tags on your site, including tags from AdWords, Google Analytics, Floodlight, and 3rd party tags. (See a list of supported tags.) Once the Google Tag Manager container tag has been added to your site, you update, add, and administer additional tags right from the Google Tag Manager web application.
Your Google Tag Manager account allows you to administer the tags for one or more websites. Although you can set up multiple Google Tag Manager accounts from a single Google account, you’ll typically only need one Google Tag Manager account per company or organization. Read Setup and Workflow to learn more.
Setup for Web
To manage tags using Google Tag Manager:
Go to tagmanager.google.com to create an account (or to access an existing account).
Create a container for your site in the account.
Add the container snippet to your site.
Migrate any hardcoded tags (such as AdWords or DoubleClick tags) from your site’s source code into Google Tag Manager.
You’ll then be ready to do all of your future tag management for your site via the Google Tag Manager user interface. For more information, read Setup and Workflow.
Google Tag Manager for Mobile Apps
Google Tag Manager is useful for managing configuration values that you want to change in the future, or that can change conditionally. Instead of defining constant values in your mobile app, you can make them dynamic and use Google Tag Manager to manage the rules that govern how these values change. Examples include:
dimensions and locations of ads served in your application, for example, to change ad banner height based on screen size
game settings
user interface settings, such as differences between platforms
localized strings determined by device language
How It Works (Mobile Apps)
A container in Google Tag Manager holds the variables and triggers (formerly known as rules and macros) which govern how the configuration and flag values in your app are set. You manage the container – editing its variables and triggers, previewing, testing, and publishing new versions of the container – from your Google Tag Manager account. During app development, you use the Google Tag Manager SDK to associate a container with the app. You also provide a default container to deploy with the app. The default container is used to set default configuration values until the first time a container is downloaded. Once the app has connected to the internet and downloaded a container, it will never use the default container again. Applications periodically check for container updates, typically every 12 hours.
Setup for Mobile Apps
Go to tagmanager.google.com to create a Google Tag Manager account (or to access an existing account).
Create a container for your app in the account (select the "Mobile Apps" option).
Download and implement the Google Tag Manager for Mobile SDK.